Do you want to be a more creative leader? A more effective facilitator? It may be time to try visual thinking—that is, externalizing your ideas using drawings, words, and frameworks—to make ideas more clear and actionable.
What makes a great facilitator? It’s more than the ability to manage people or run a meeting.
Great facilitators are guides who help people navigate discussions, activities, and feedback.
They are engaging and know how to provide a space for people to collaborate.
How Great Facilitators Accelerate Objectives
Admittedly, that’s a lot for one person to balance during meetings and workshops—so it might seem overwhelming to take on more while leading groups.
Yet that’s exactly what we’re going to ask you to do.
Facilitation should be about making things easier to do and understand. At XPLANE, we’re huge proponents of using visual thinking to accomplish objectives more quickly and efficiently.
What is Visual Thinking?
Visual thinking is more than just drawing. It is externalizing ideas—through sketches, sticky notes, words, and frameworks (in person and virtually)—to make them more clear, explicit, and actionable.
When you draw, visualize, or simply write words on a whiteboard or digital board, you make them accessible to all participants, which enables discussion and alignment on what is there.
Visualization also shows connections and relationships that are difficult to describe through speech.
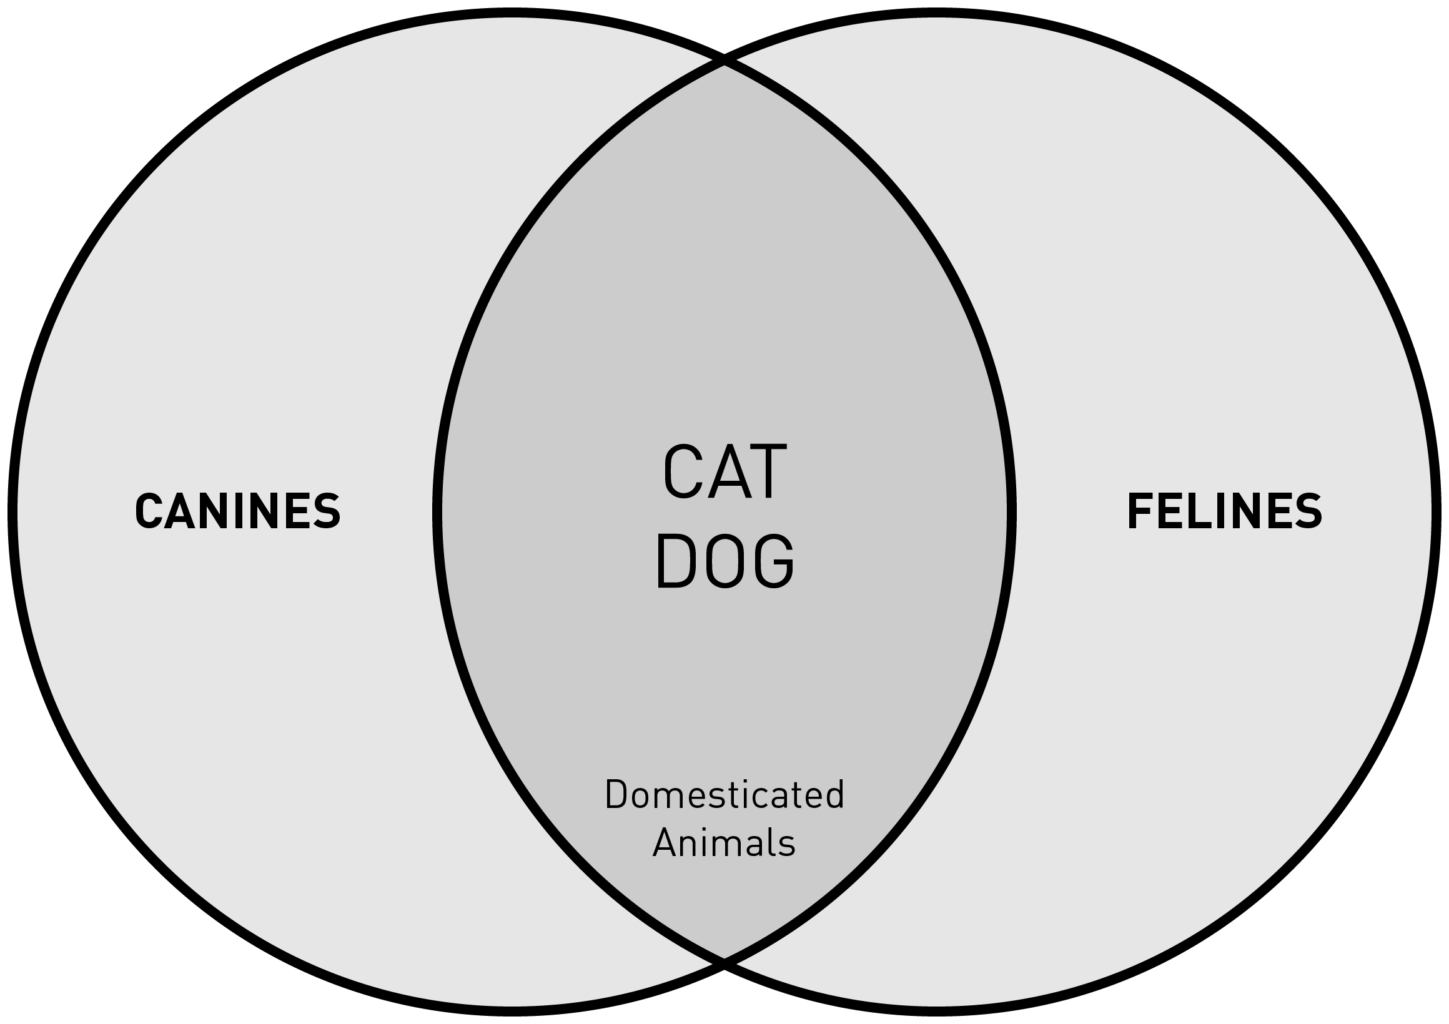
For example, hearing a description of common elements two groups share may take a bit of time to understand. But drawing a Venn diagram—placing appropriate information in the right areas—quickly conveys how all the information relates.
Visual Thinking Primer
So, let’s get started. Keep in mind the visual thinking primer presented in this blog post is not intended to be an exhaustive introduction to the topic.
Rather, it’s a guide for facilitators who have always wanted to enhance their workshops but have been hesitant to dive into visual thinking.
Our goal is to give you tools you can use immediately to increase clarity and accelerate objectives at your next workshop or meeting.
Four Principles of Visual Thinking
A good place to start is with four key visual thinking principles.
Principle 1: Draw to communicate
If you are not artistically inclined, you’ll be relieved to know visual thinking is not about art.
Think about typical 5-year-olds who draw to tell stories and put ideas on paper. This is their way of communicating when words alone are too difficult or not enough—the same concept applies to visual thinking. You want to draw to communicate information, ideas, and insights.
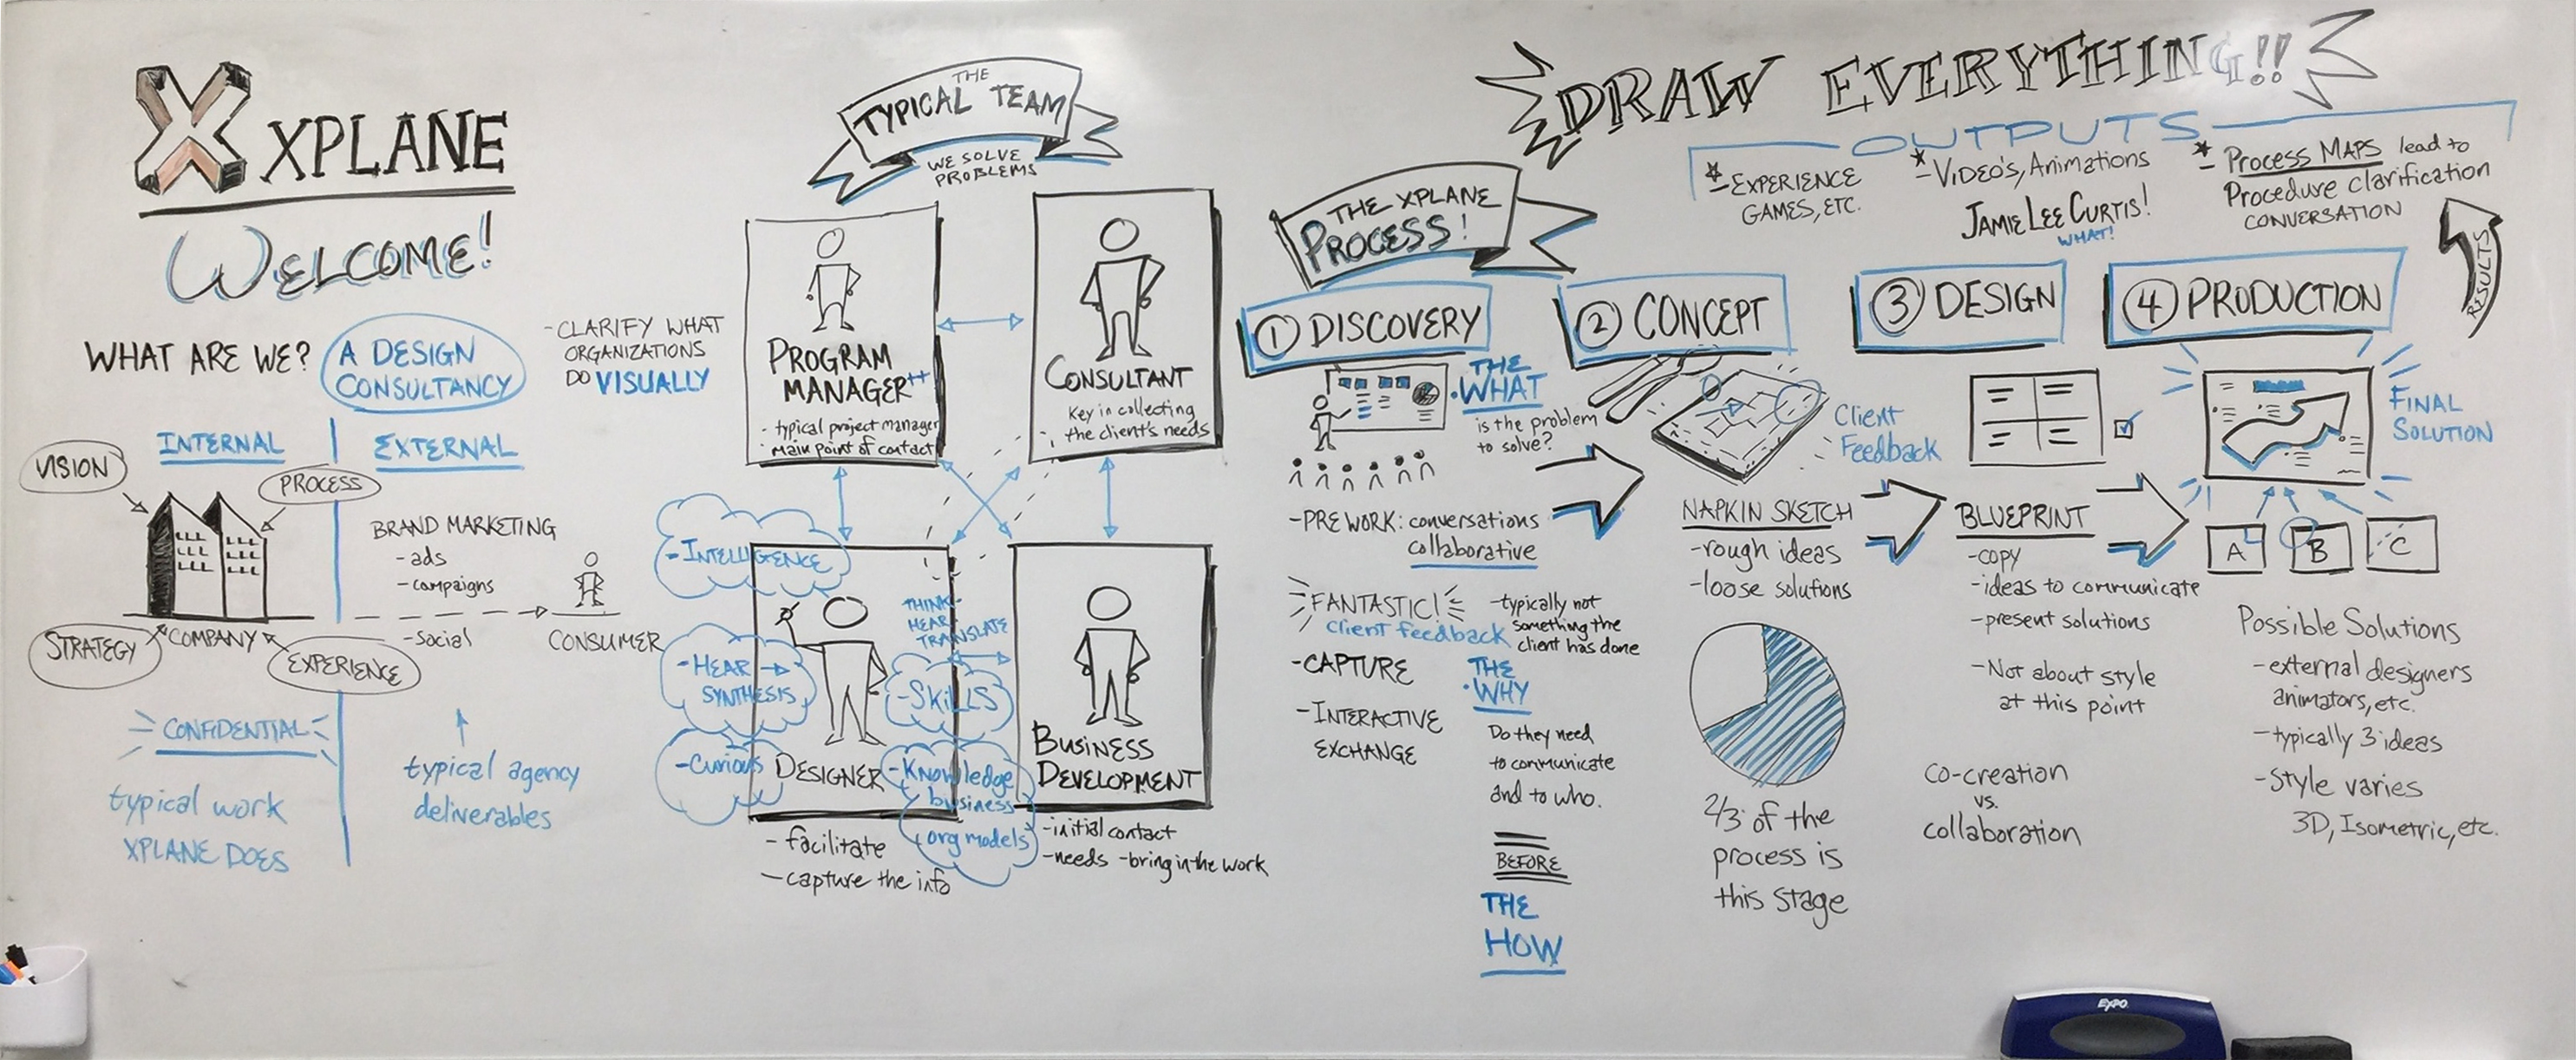
Here’s an example of a whiteboard drawing used to help communicate key points.
Principle 2: Keep things simple
Drawing in workshops can be overwhelming when you’re also leading a conversation or activity. That’s why it’s important to keep drawings as simple as possible—simple enough to draw in seconds but detailed enough to be recognizable.
Here are a few examples of typical items drawn during workshops.
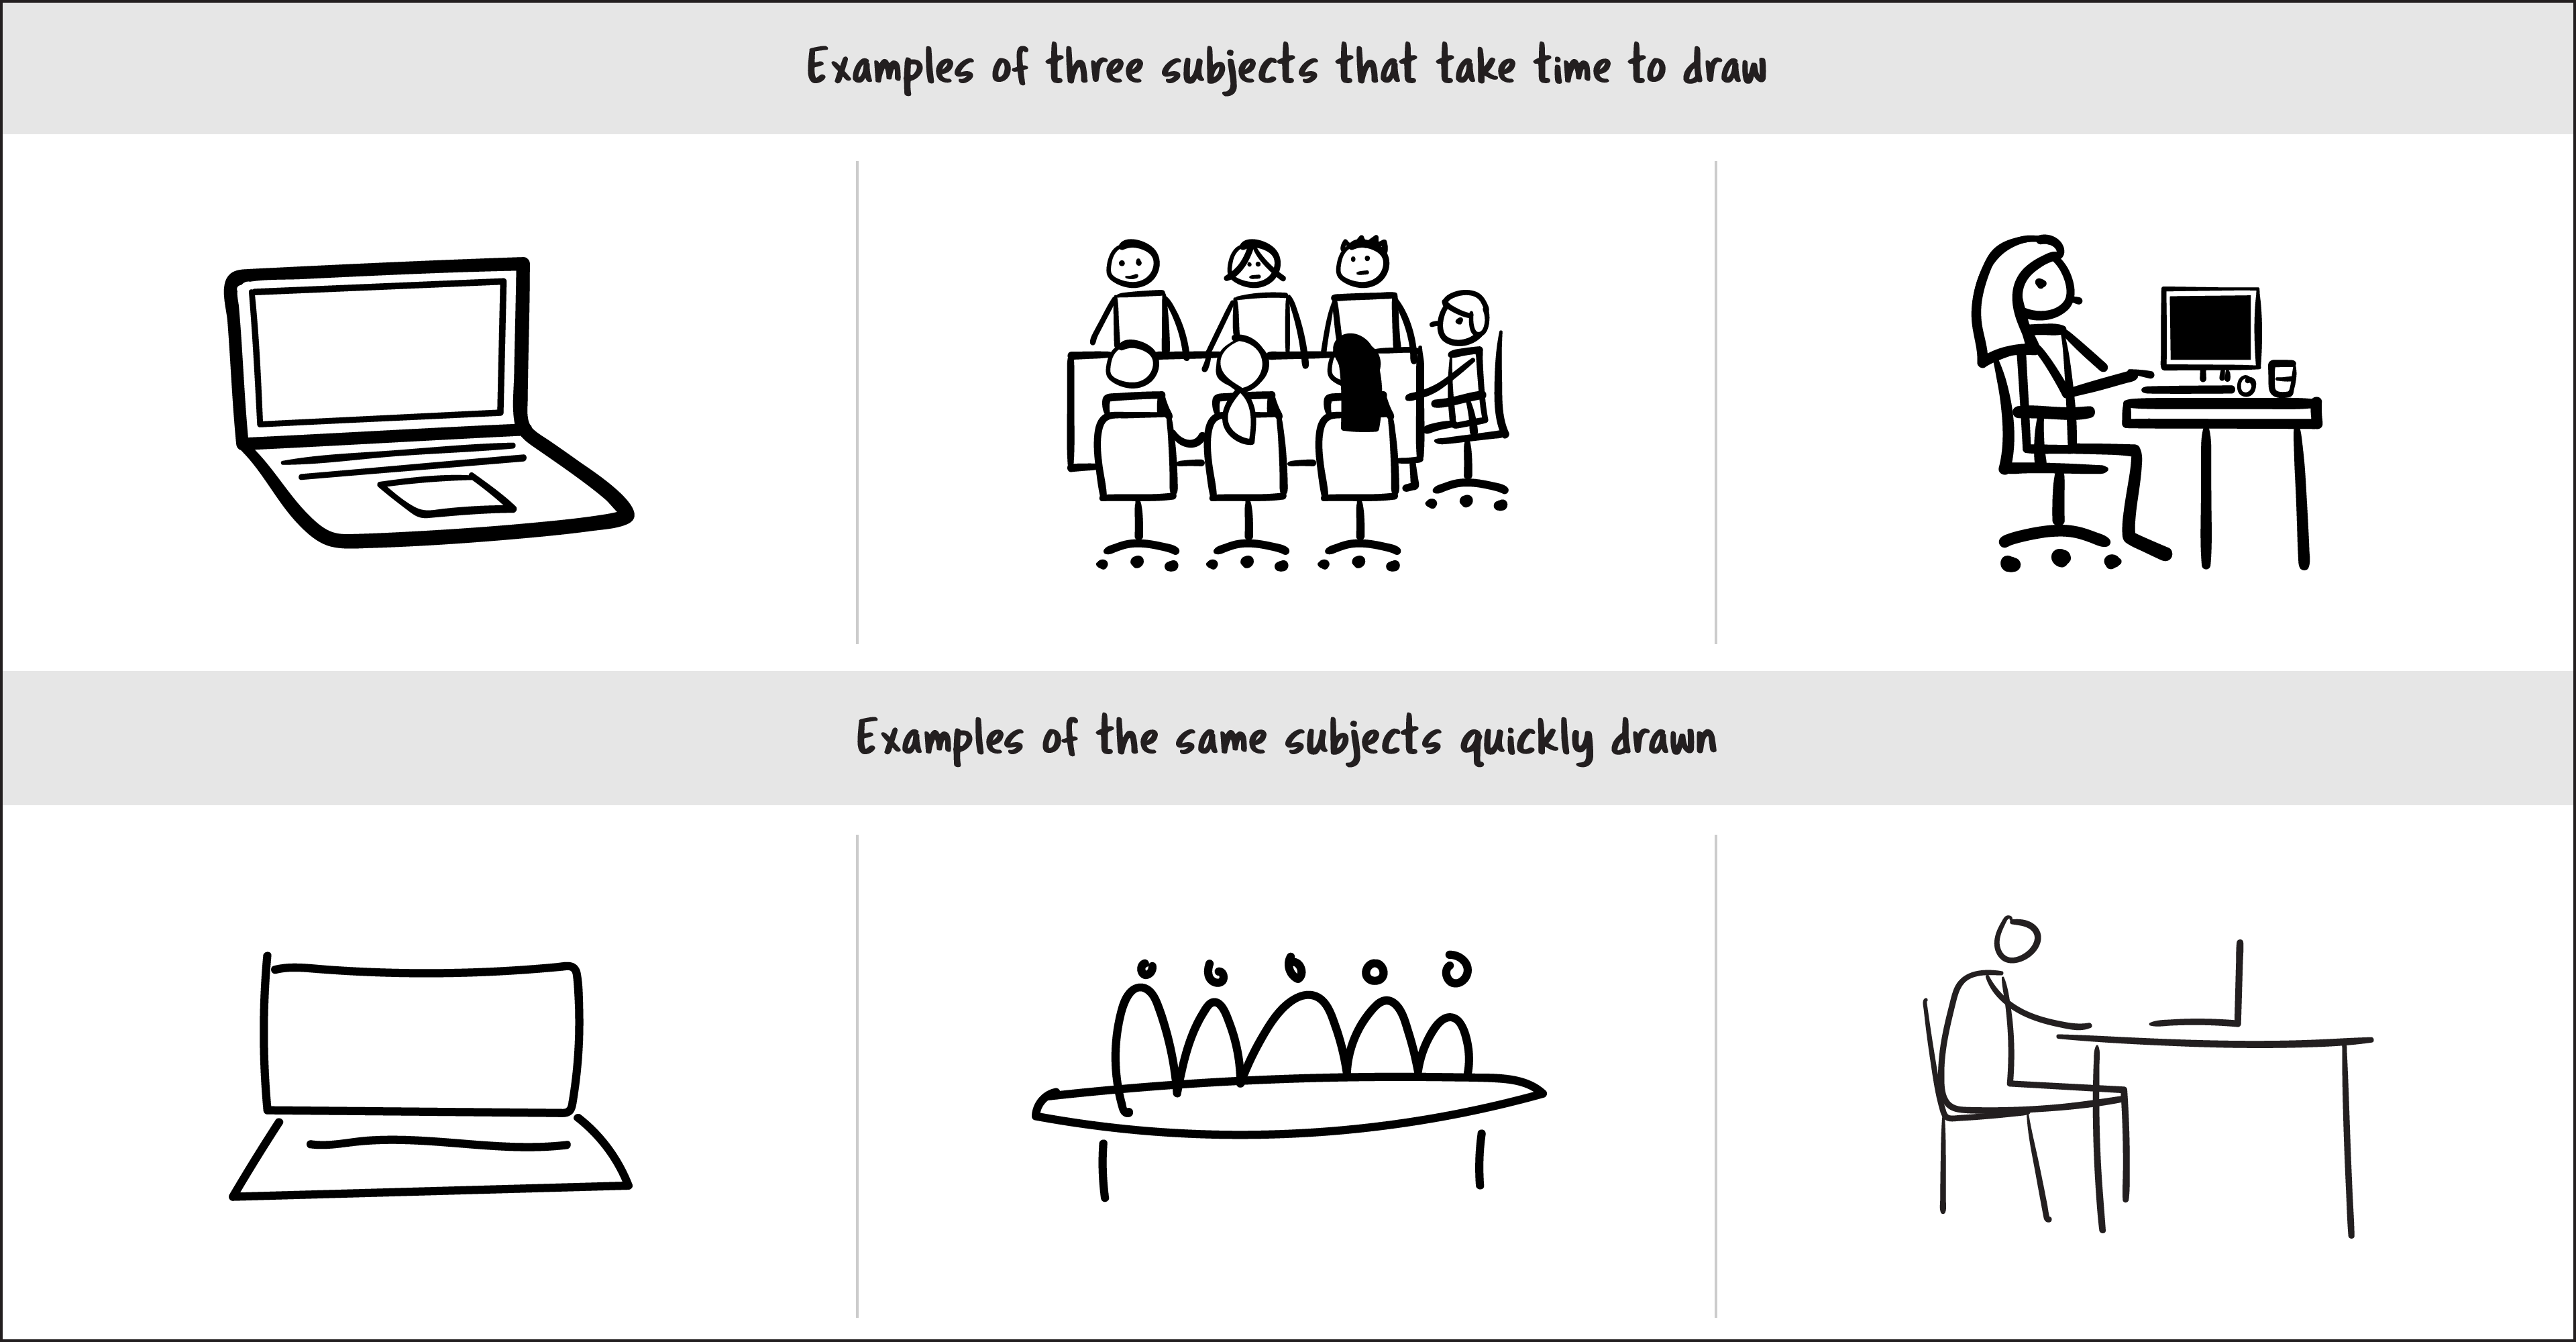
The drawings in the top row are great. However, when speed counts, the drawings in the bottom row are what’s needed—they’re enough to convey the idea and nothing more.
Principle 3: Be selective
Don’t draw everything you hear. Be selective in what you capture. The idea is to draw what you want to emphasize and connect: key ideas, information, insights, and decisions.
Principle 4: Words are okay
Visual thinking is not limited to drawings. Words are part of visual thinking, too, as shown in the Venn diagram above—a simple sketch of two circles with three groups of words.
Drawing 101: Four Foundational Drawing Skills
Ready to tackle drawing? Here are four foundational skills to get you started!
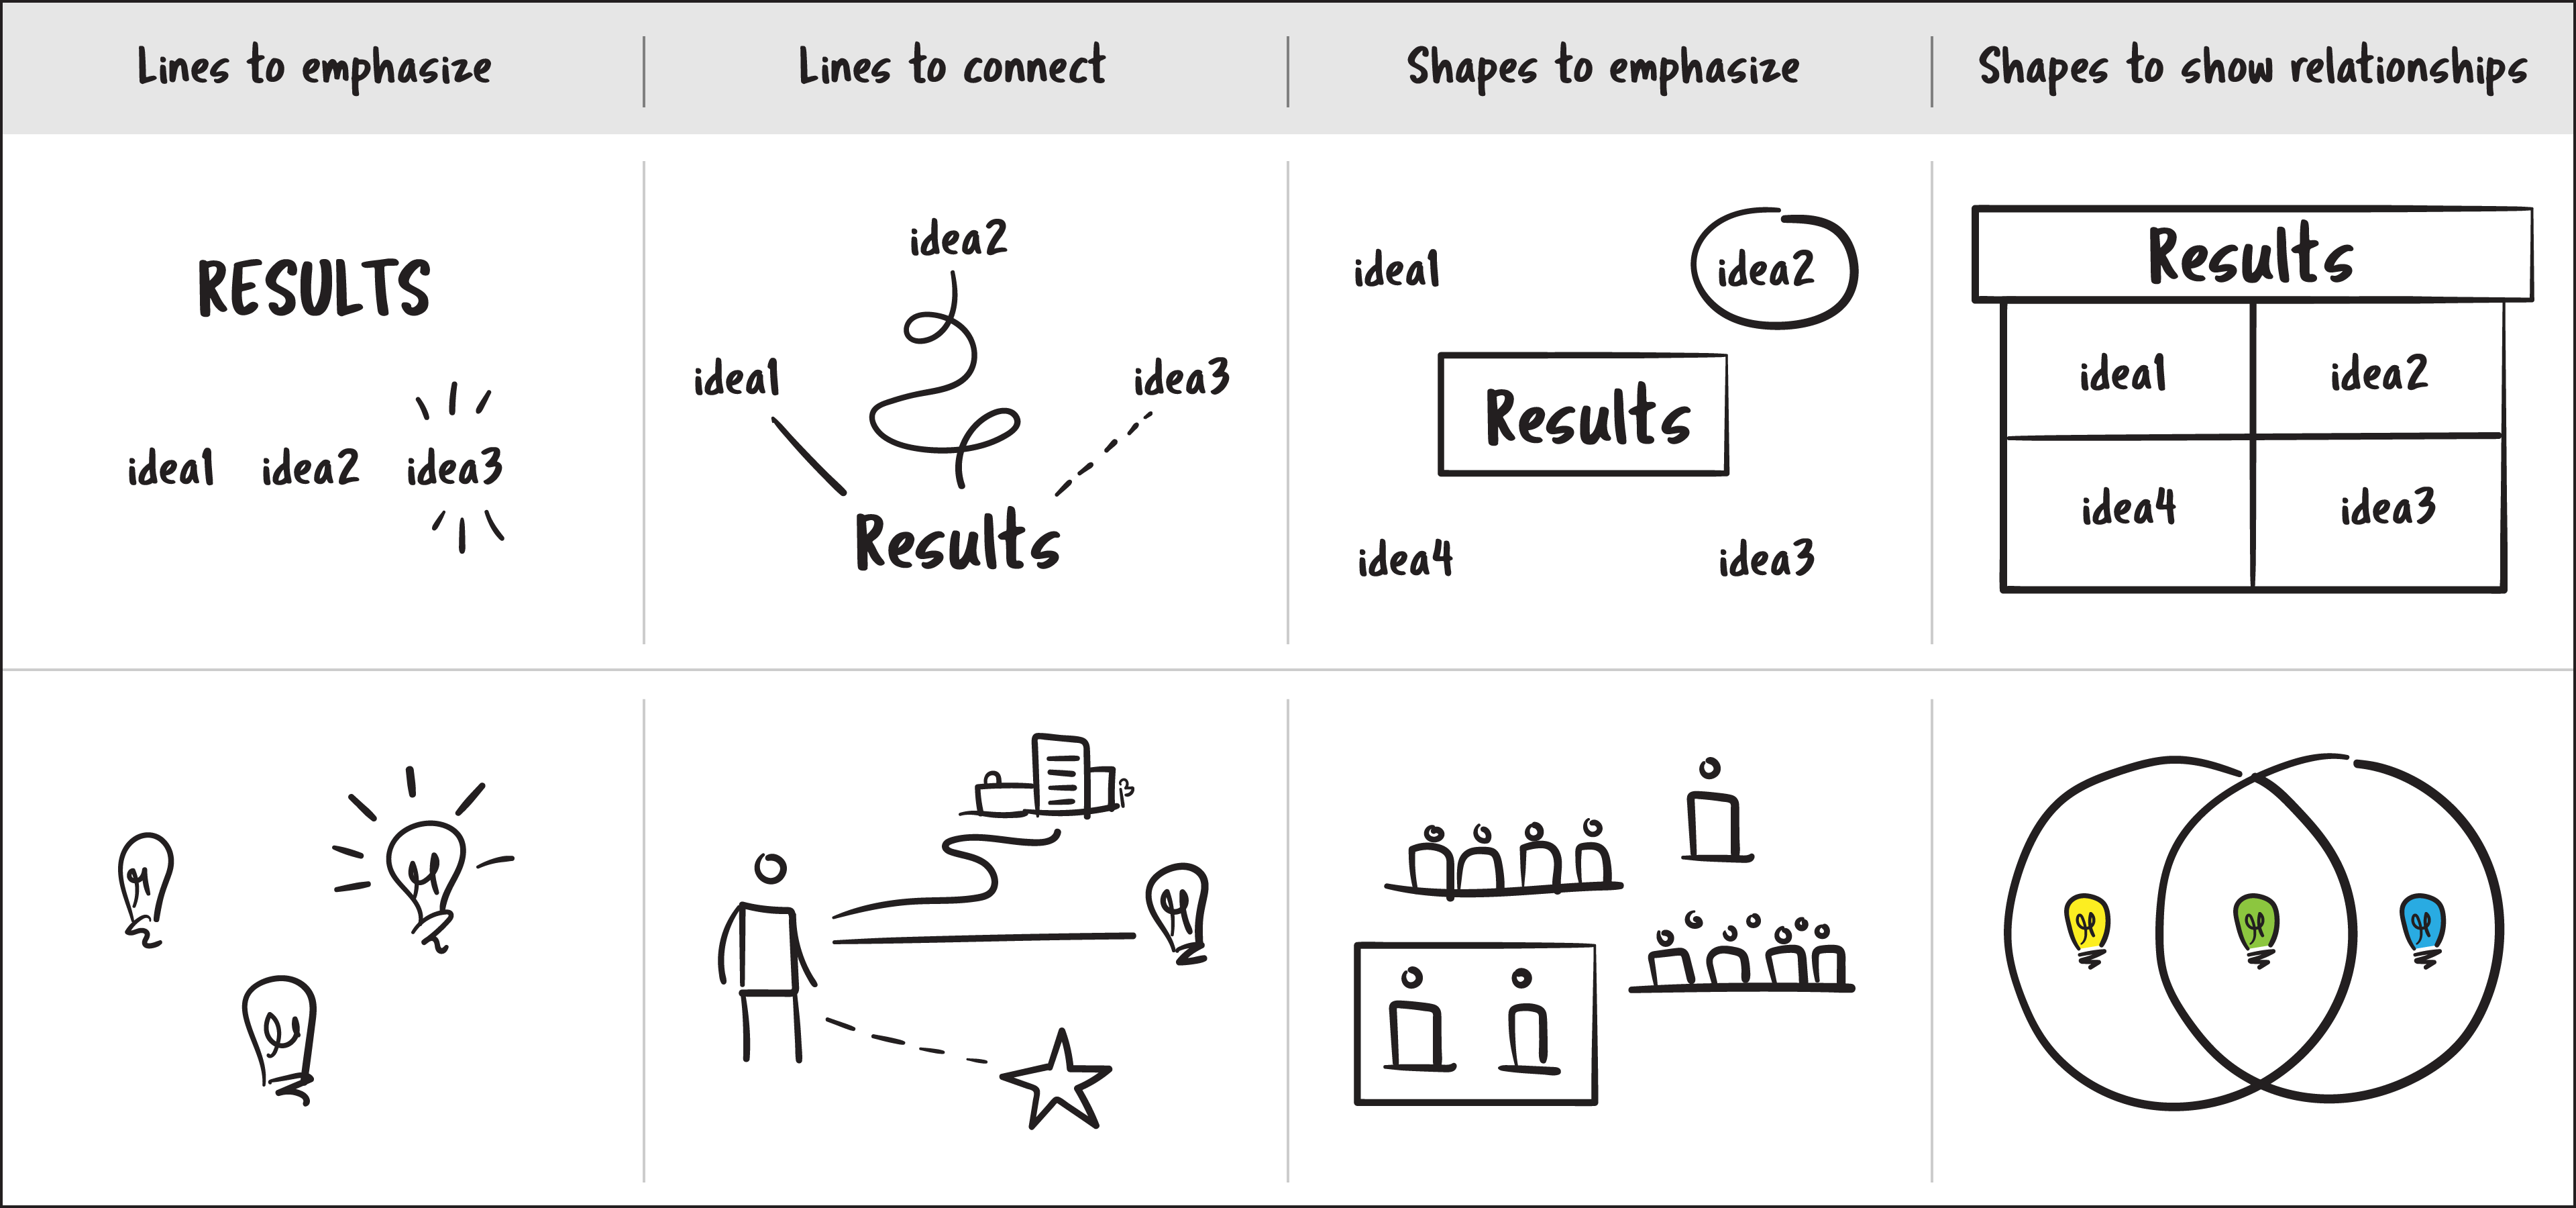
Skill #1: Lines and shapes
You may be surprised to know drawing lines and shapes is sometimes all you need to communicate visually. As visual thinkers, we want to be able to emphasize and connect key thoughts and ideas. We can also use lines and shapes to illustrate people and objects.
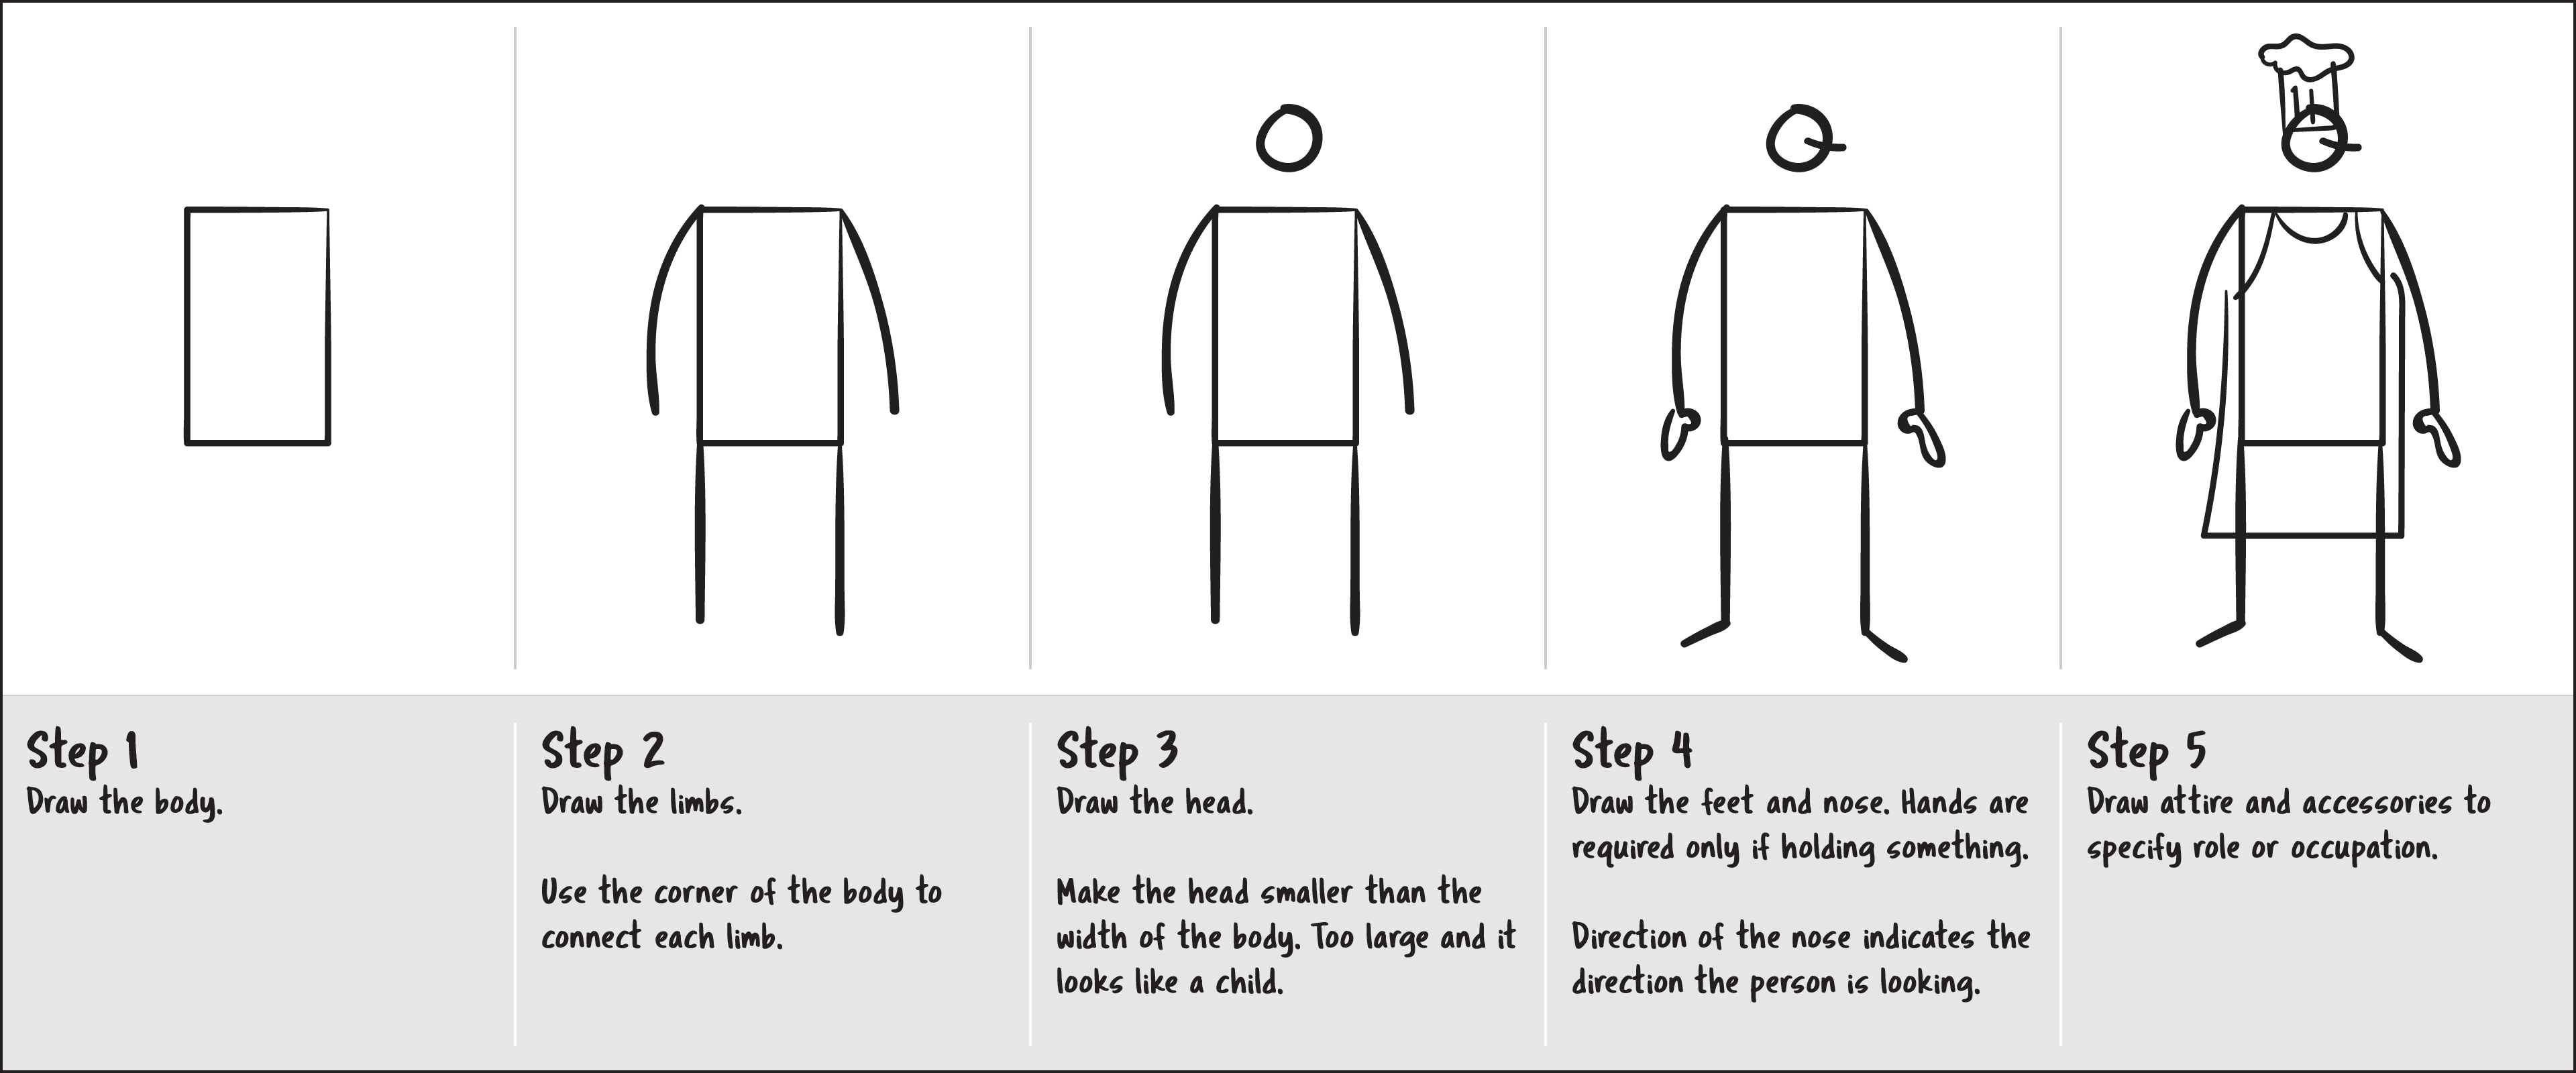
Skill #2: People
At XPLANE, we draw a lot of people because people-centered design is one of our key principles. Centering your sketches around people helps tell stories with the right emphasis and perspective.
It’s also a reminder to think about people throughout the process of discovery, design, and implementation, which is key to developing relevant, meaningful solutions people will embrace, support, and own.
Here’s how we quickly draw people.
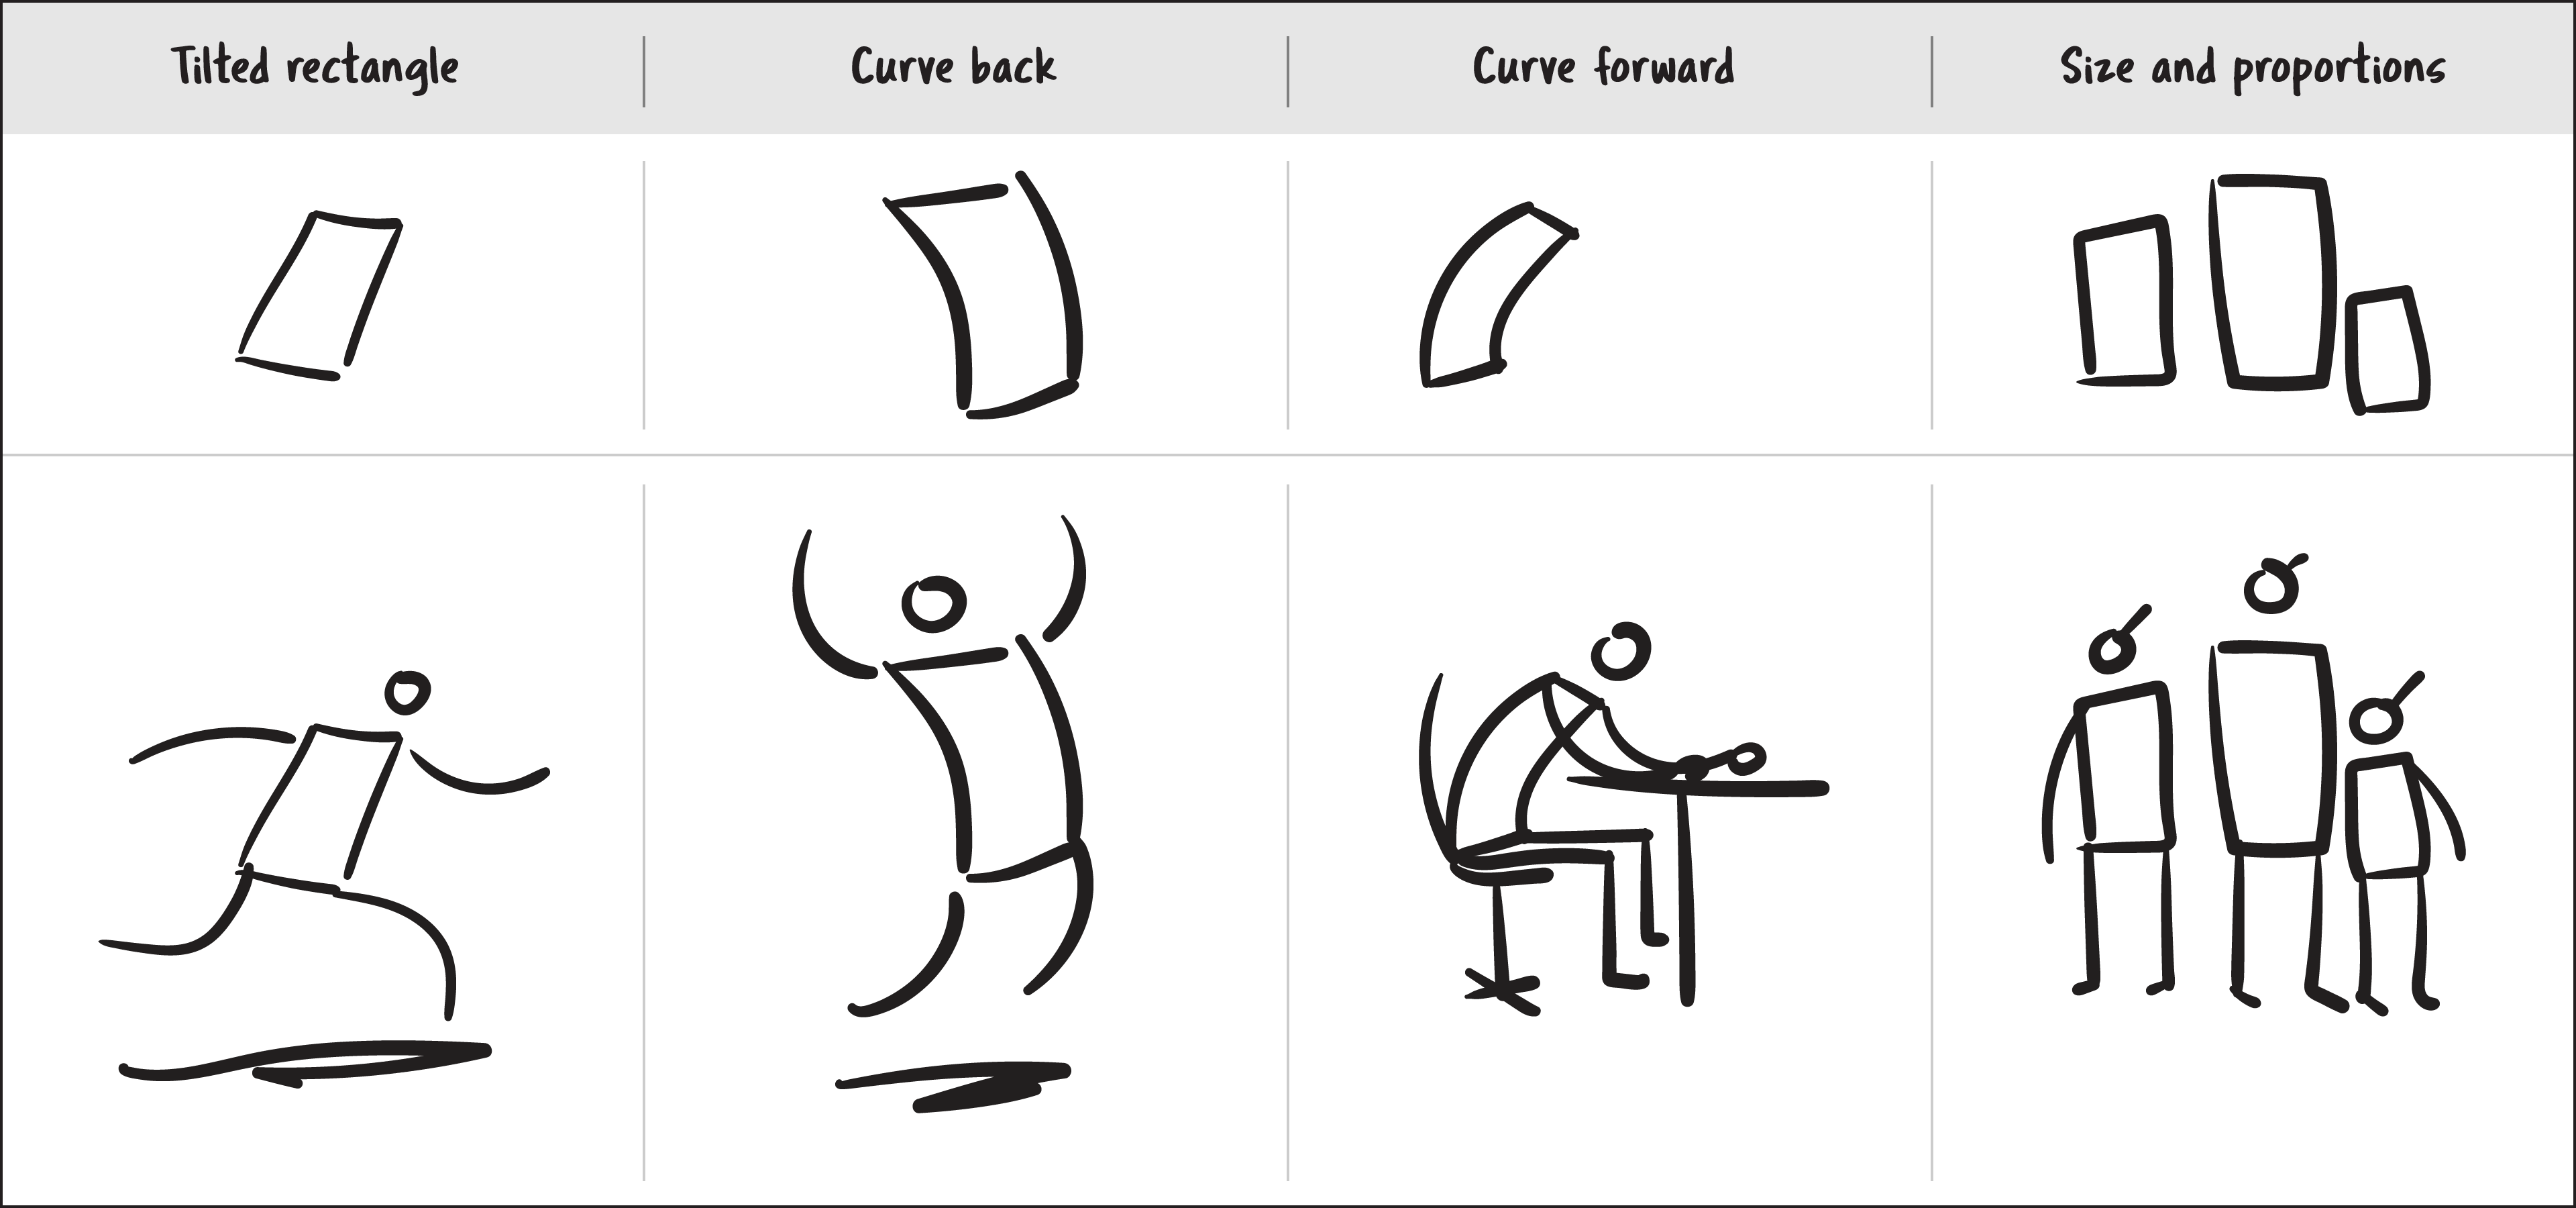
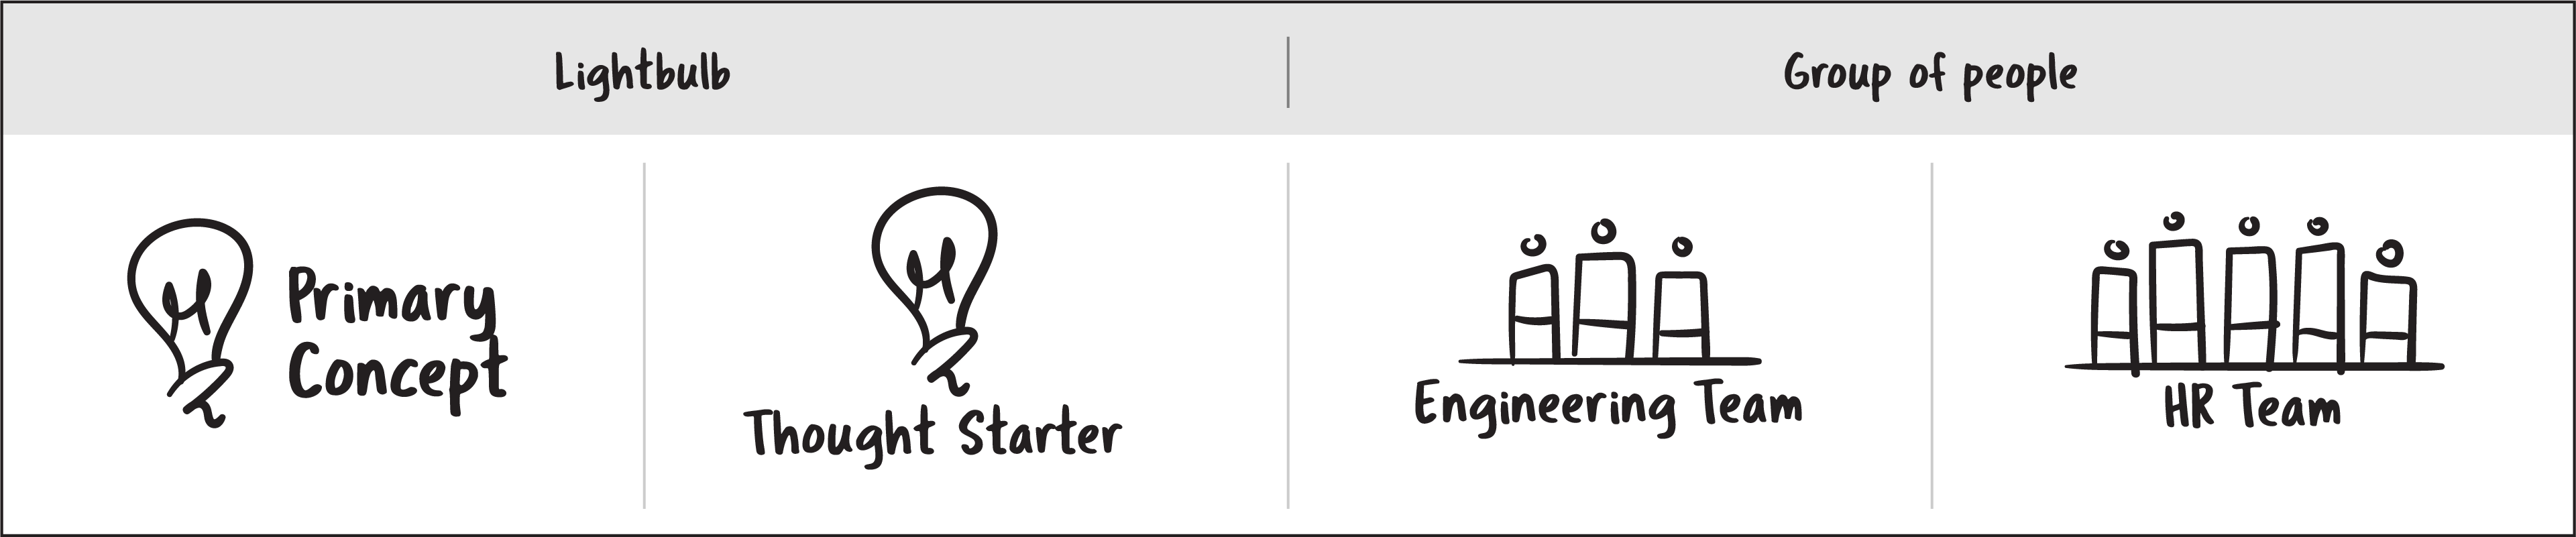
Here are four ways to quickly change the shape of the body to provide variety in shape, motion, and relationships and convey four typical scenarios.
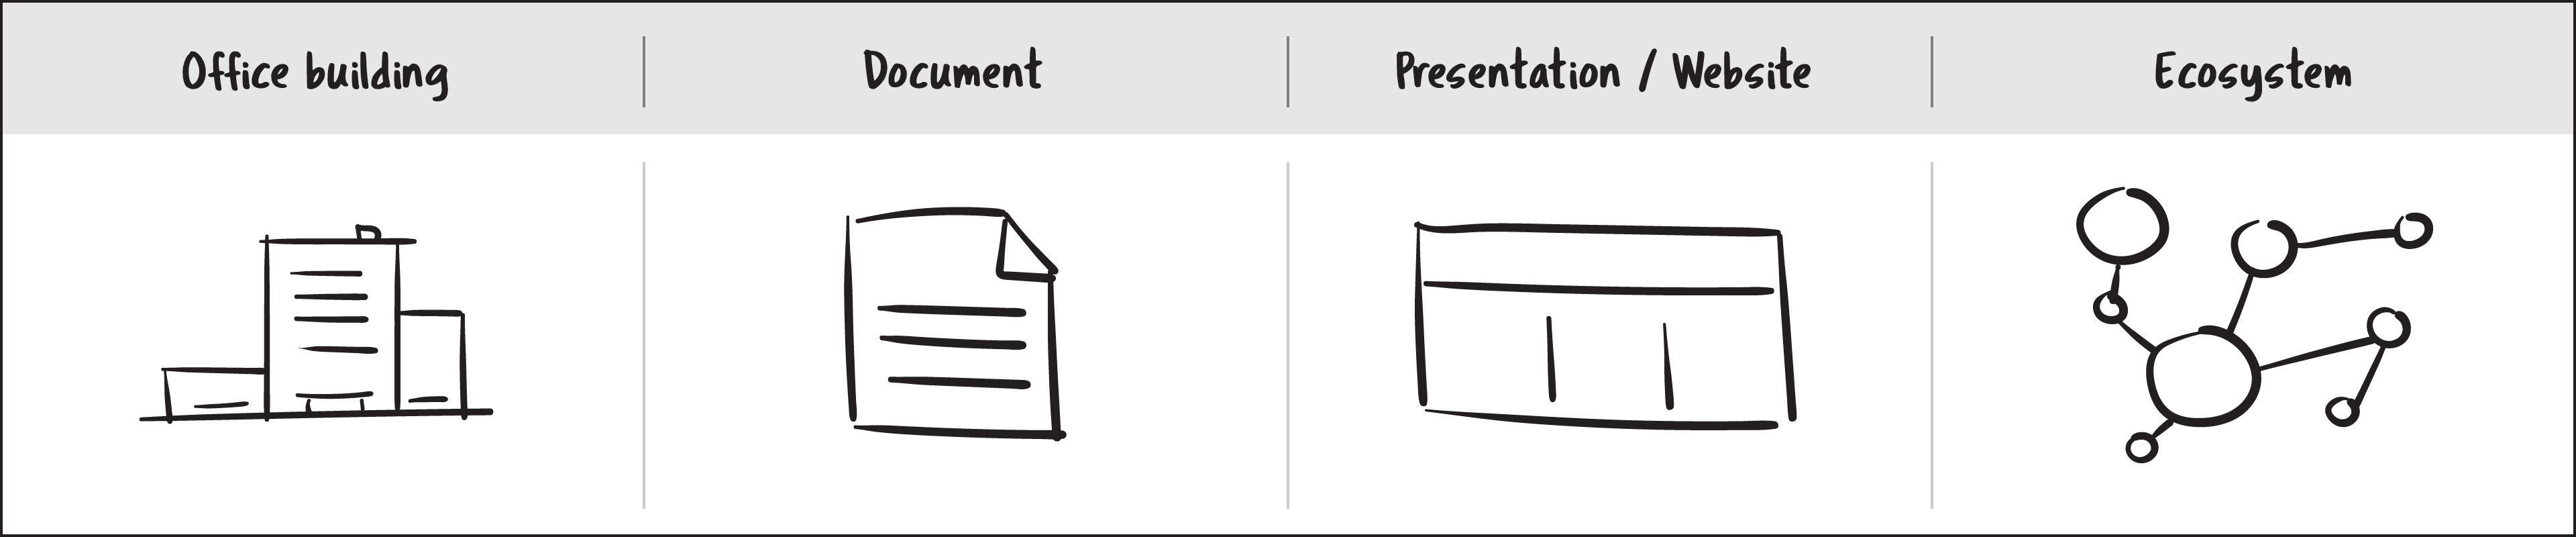
Skill #3: Simple objects
Don’t limit yourself to lines, boxes, and people. Start to explore. Think about everyday things that can be drawn and are useful to emphasize.
Learn a few objects and kinetic lines, keeping in mind the types of workshops you typically lead or participate in.
For instance, if you lead discussions concerning general business practices, you might want to know how to draw things and people in general business situations.
If you lead discussions about medical activities, you may want to master simple drawings of medical situations and objects.
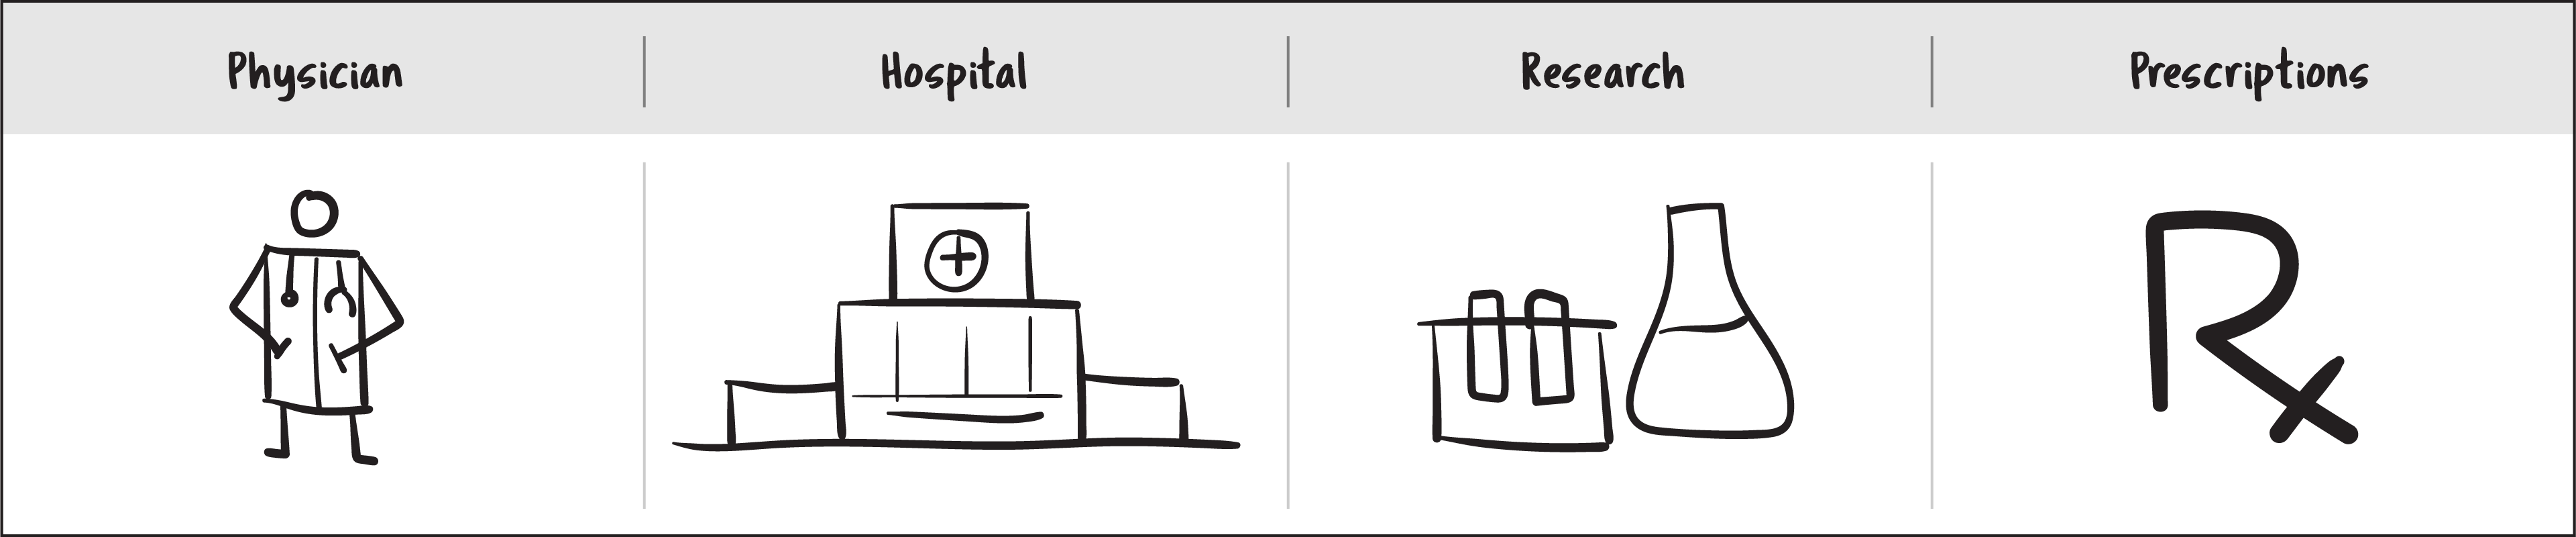
And if you lead meetings about topics related to education, you may want to master simple drawings of education-related situations and objects.

Label everything
Drawings alone, especially in workshops, may not provide enough information to participants. Label as many of your drawings as you can while drawing them. This will help you capture your story as faithfully as possible—and it will help you remember specifics after the workshop ends.
Skill #4: Use frameworks
Frameworks—such as Venn diagrams or graphics that organize information to serve a specific purpose and show how groups of content relate—are the simplest way to get started in visual thinking.
To use frameworks during a workshop or meeting, you can either bring a printout large enough for a group to work on or draw the framework on the whiteboard or digital board.

Three Visual Thinking Methods for Facilitators
As you grow your skills, here are three visual thinking methods you can use right now to enhance workshops and get ideas flowing.
Method #1: Magic Snow / Future Perfect Exercise
In our Magic Snow / Future Perfect exercise, workshop participants draw and share what they believe the future state of their organization should be. Typically done at the beginning of a workshop, this exercise is completed individually and takes about 30 minutes, depending on the length of discussions.
Here are the steps:
- Give each participant a piece of paper and access to colored markers.
- Ask the group to sit quietly and listen for a moment. Pause for two to three seconds, then slowly say:
Sit for a minute and suppose…just suppose…that tonight a miracle occurred and when you walked into the office tomorrow, it was next January, covered in snow. And just suppose everything you hoped would happen over the year had come true. What does that look like? Draw that picture. What’s changed? What are you doing differently? What are others doing differently? - Give participants at least five minutes to complete their picture. Then ask each participant to describe their picture to the group, and create a gallery of the pictures on one wall.
- Discuss and write down common themes and elements, and ask about the things people would be doing differently.
This gallery of pictures becomes a great reference throughout the day to keep the group focused on what they want their future to look like.
Benefits:
- Easy to implement
- Sets the tone of the workshop immediately
- Provides a visual artifact for all participants and facilitators to refer to throughout the day
- Highly engaging and satisfying
- Relies heavily on facilitation skills instead of drawing skills of the facilitator(s)
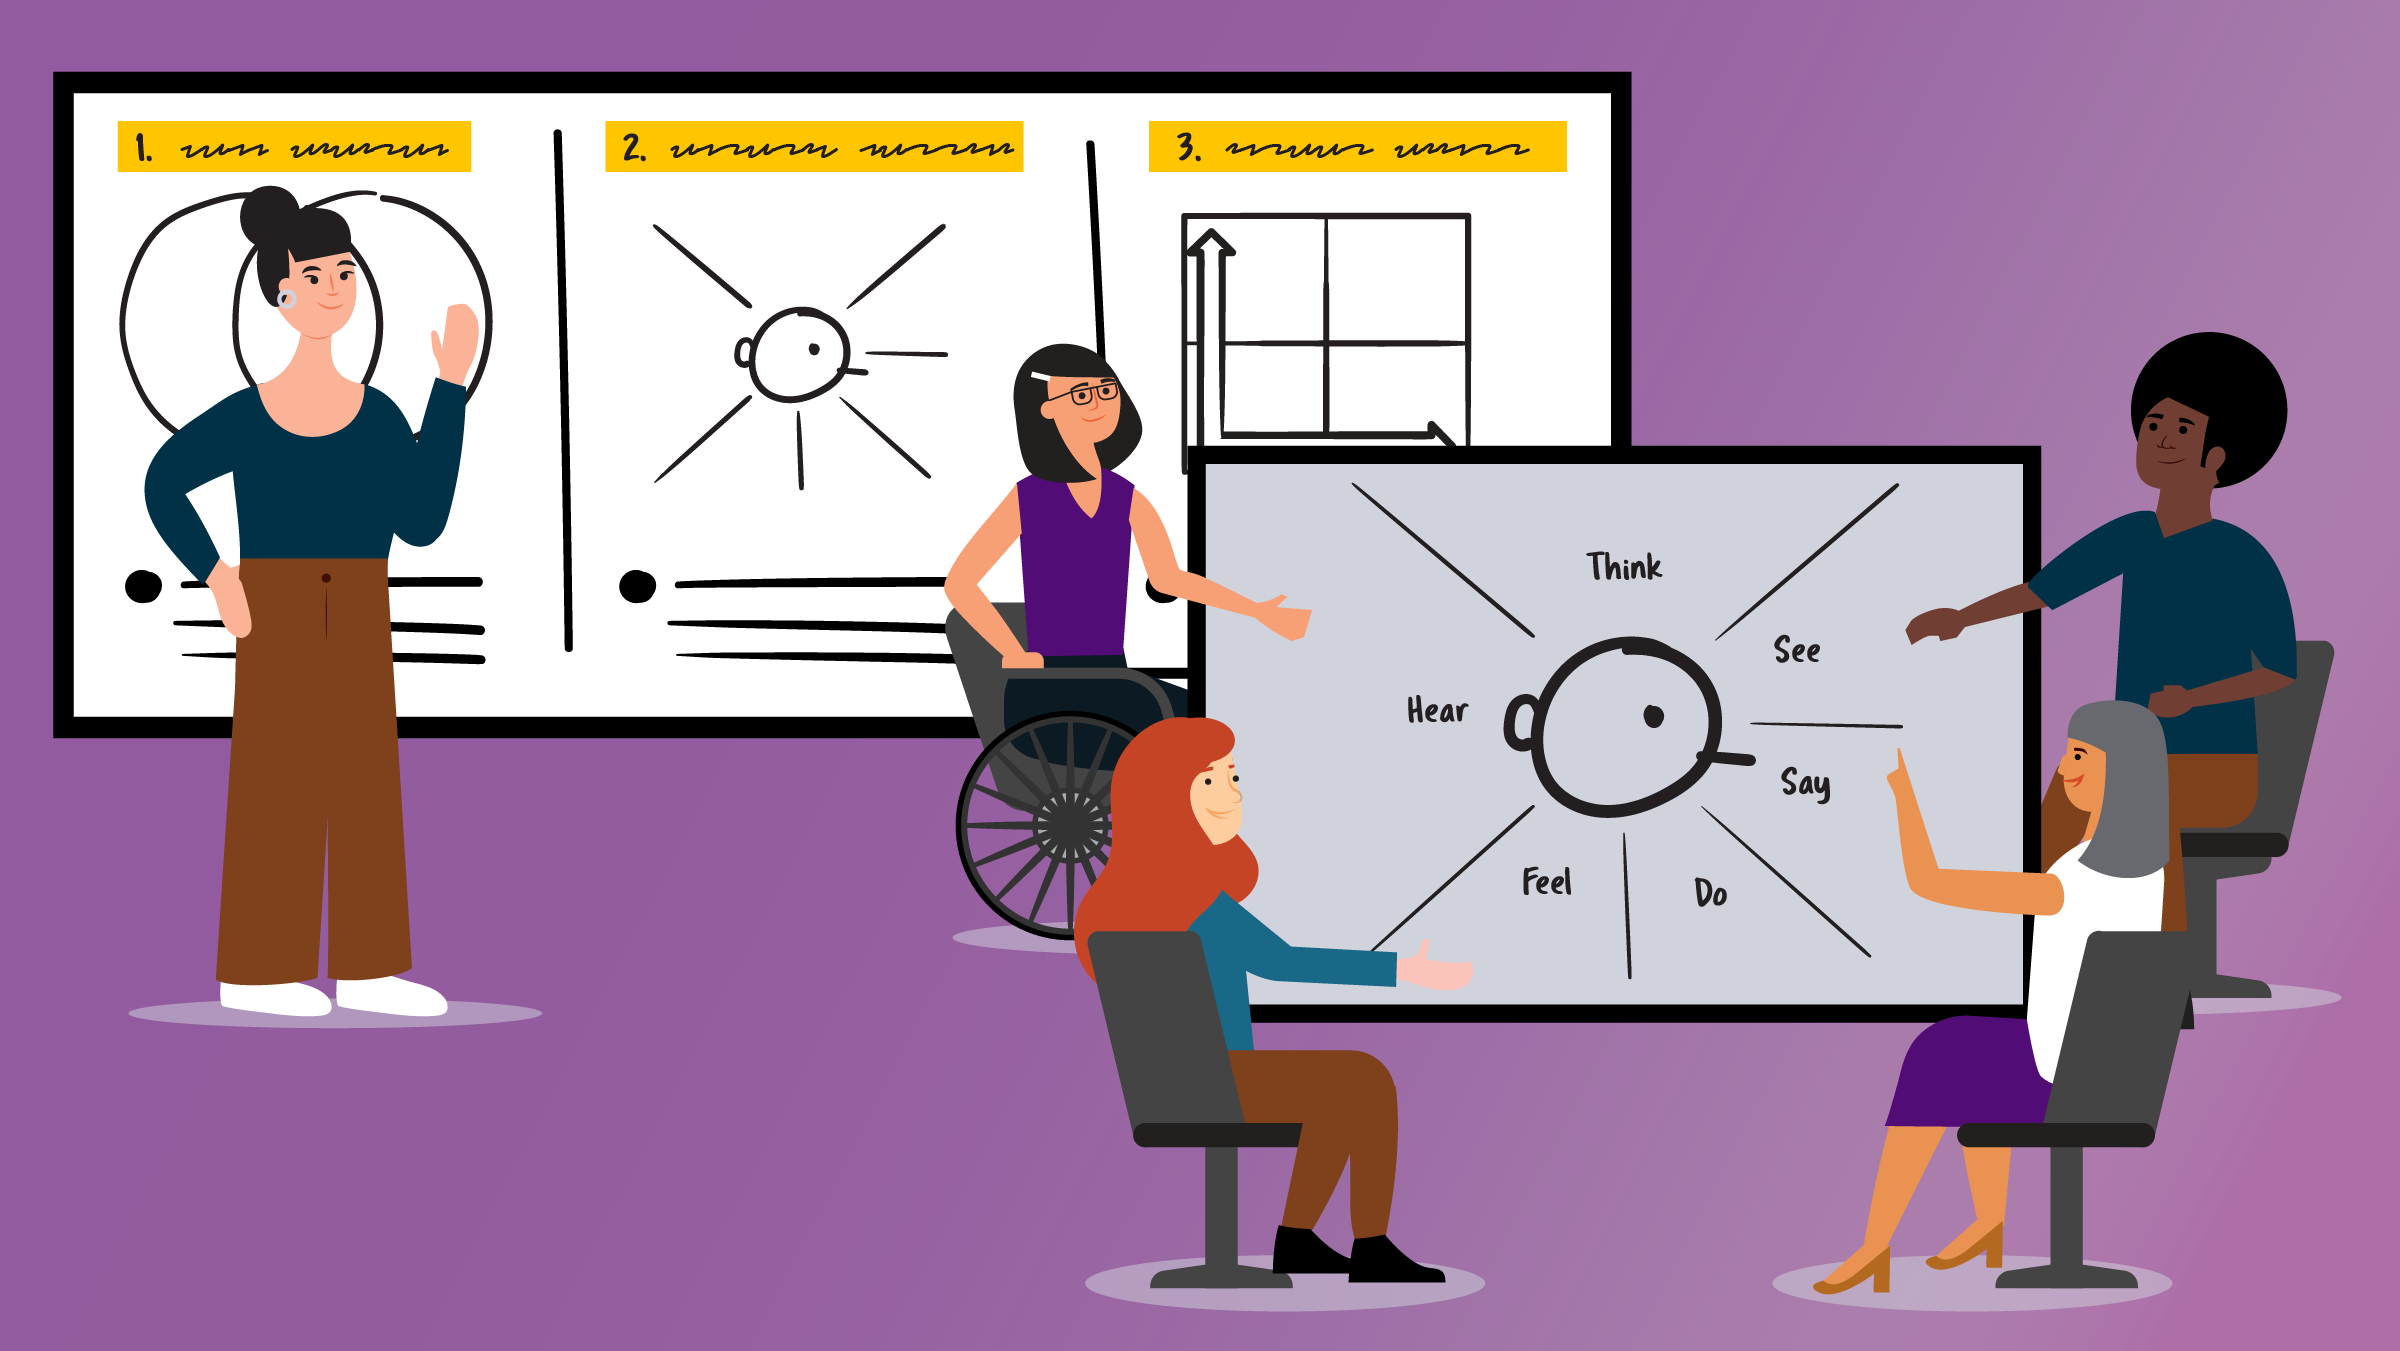
Method #2: Using a framework—Persona Empathy Map Activity
A group activity that takes about 20 minutes to complete, the Persona Empathy Map exercise helps people empathize with a target audience using multiple lenses into their day-to-day activities.
First, you’ll want the group to brainstorm a list of multiple personas within their target audience. Once these personas are identified, divide the room into corresponding groups to discuss and capture information on one of the personas.
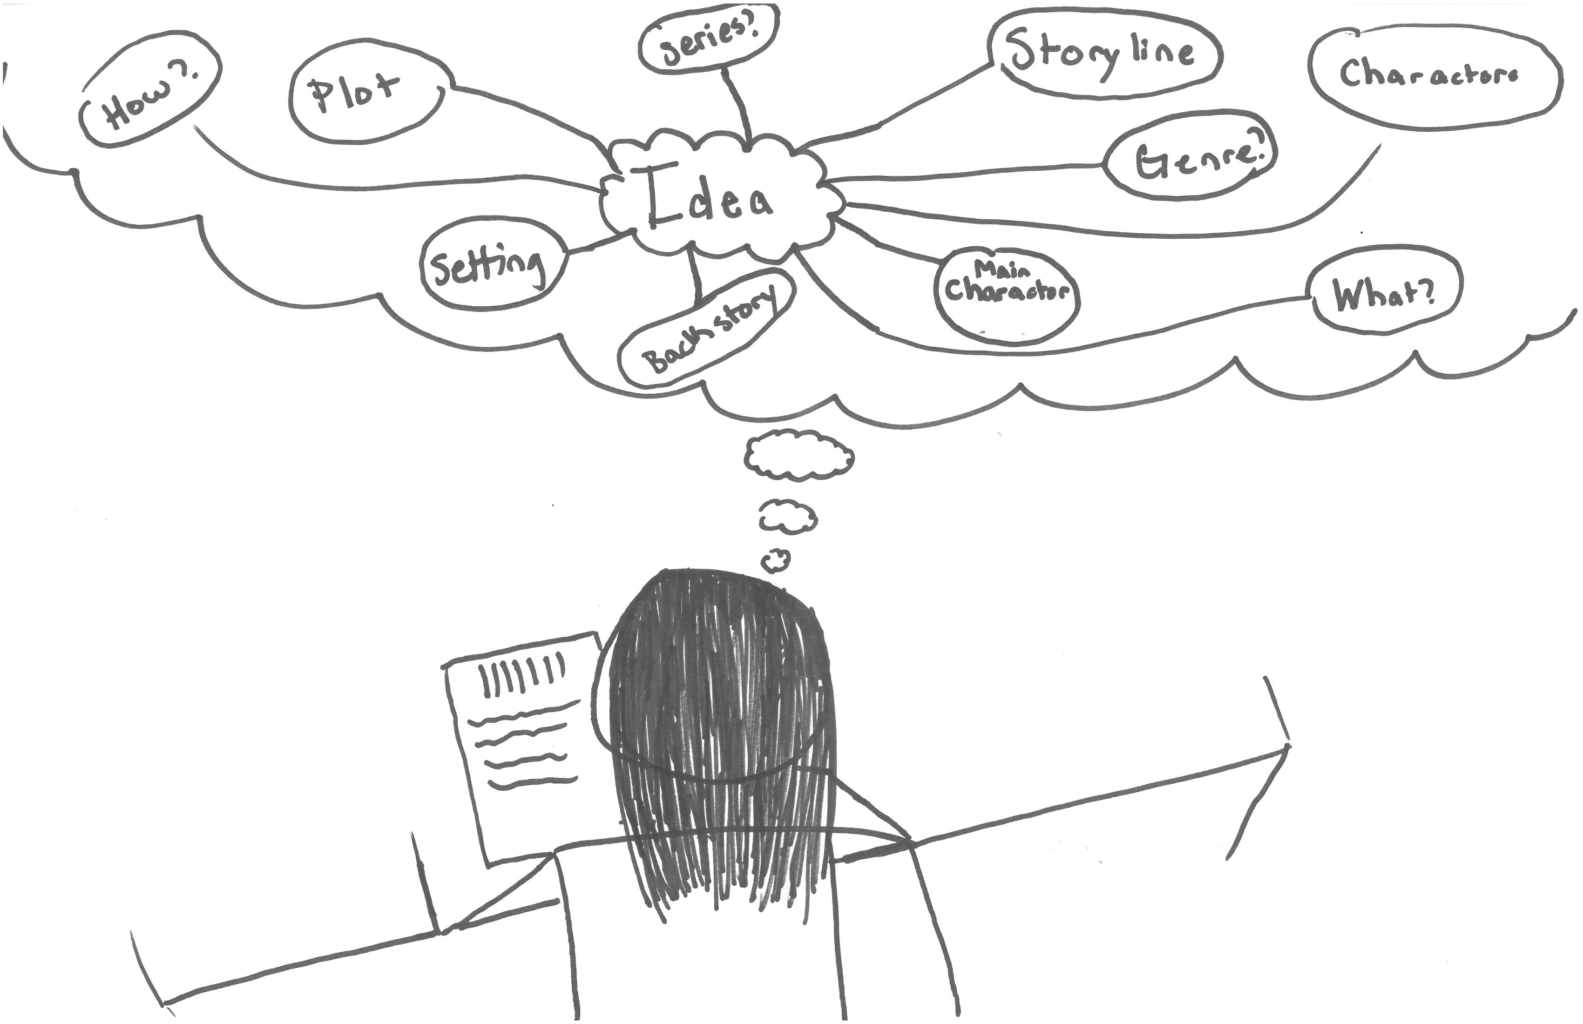
- On a large poster or whiteboard, draw a head or profile of the target audience. Give this person a name.
Note: When creating a representative of a large or diverse group of people (users, for instance), it may be better to use an abstract or fictional title. When creating a representative of a large or diverse group of people (users, for instance), it may be better to use an abstract or fictional title. If you’d like more specific insights, you might want to use the name of a real person or role. - Label five different areas around the head: Hearing near the ears, Seeing near the eyes, Feeling and Doing below the head, and Thinking above the head.
- Ask the group to put themselves into this person’s shoes, which is key to creating empathy. Then have them ask the following:
What’s changed?
What are you doing differently?
What are others doing differently?Note: When collecting thoughts, give more weight to more significant pieces of the puzzle. You may want to consider color-coding the types of thoughts, sights, and sounds.
- Ask participants to brainstorm ideas around each lens, and post one idea per sticky note to the drawing. This may be done one at a time, while the group presents their ideas, or they can post ideas all at once as a group without presentation.
- Discuss and write down common themes for each empathy map.
Benefits:
- Visually rich representation of what the target audience thinks about and the forces at work in their lives
- For the facilitator, this starts to lead into drawing—although many words will be used, the facilitator can start drawing out or emphasizing main themes

Method #3: Drawing to summarize
Drawing while facilitating is difficult. Practice your drawing skills by taking advantage of quiet times or breaks during your workshop. Developing themes or insights for one activity while groups are working on another activity is a great opportunity to flex your visual thinking skills. Organize ideas and draw out themes. Pictures are a great way to emphasize a category of information.
A few tips for beginners:
- Draw when single ideas are generated. It is much easier to draw and write a single idea than trying to capture a conversation.
- Draw the summaries or themes when synthesizing a group of comments and sticky notes. Drawing after the main discussion has occurred minimizes the stress and fatigue of handwriting or drawing constantly.
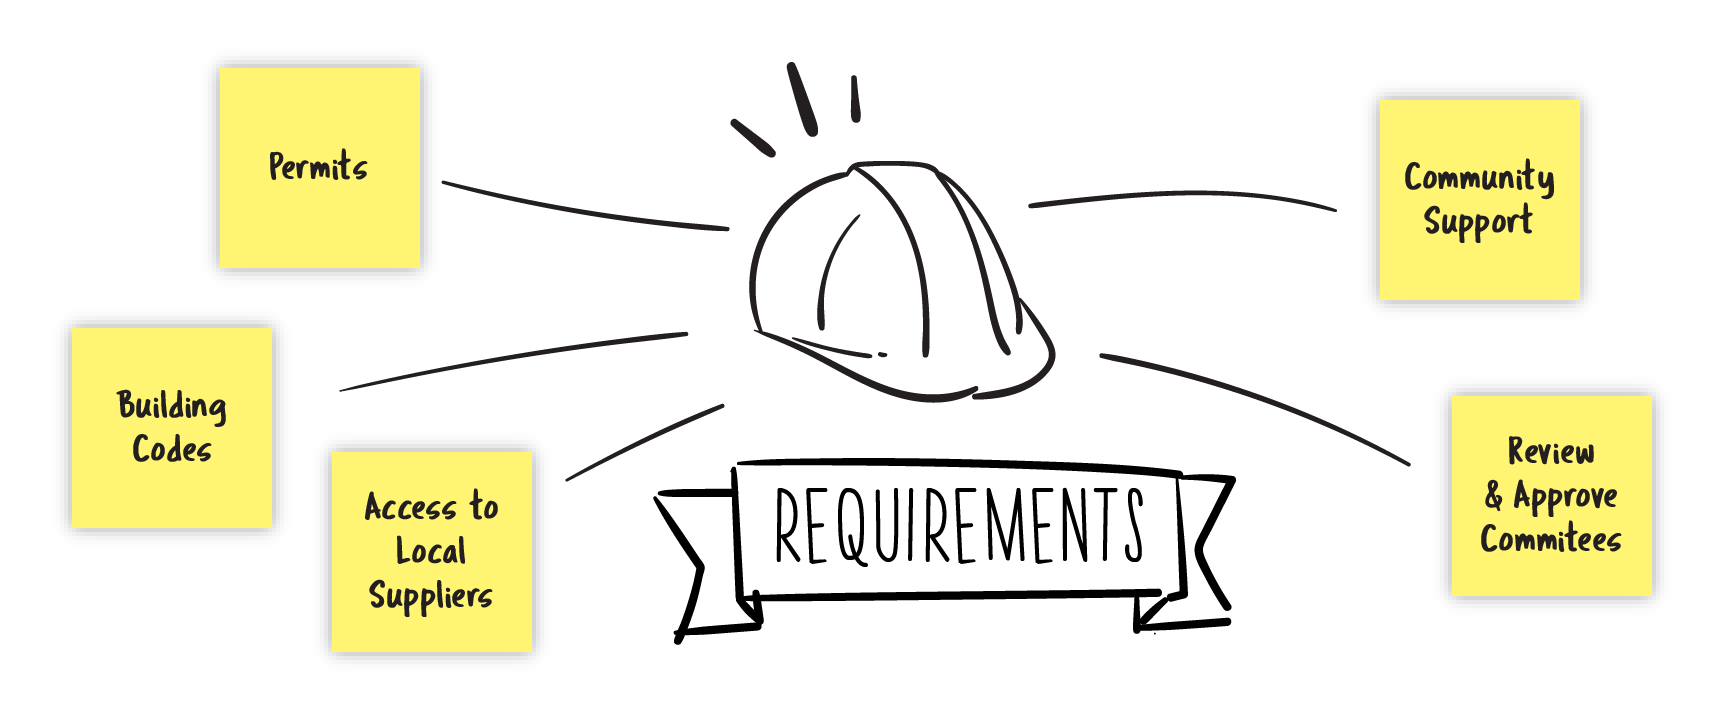
- Draw a single element and write words around it. For instance, if the topic is “construction requirements,” draw a hard hat and write requirements around the hard hat. This is a great way to emphasize and differentiate topics or themes.
Benefits:
- Live drawing is a highly engaging activity to see unfold
- When you emphasize an idea with a picture and words, you dramatically increase retention
Elevate Your Workshops with Visual Thinking!
Using the principles and methods we’ve discussed here, you can infuse your facilitation skills—and your meetings and workshops—with more meaning, connection, understanding, and engagement.
Not only will you achieve your objectives faster, but you’ll also make concepts and decisions more memorable and actionable.
Learn more about the principles and methods during our Design Your Facilitation Strategy course. Led by our expert facilitators, you’ll acquire new facilitation skills, and learn how to lead more productive meetings that move your objectives forward. Check out our course today!
Additional Information
To learn more about the power of visual thinking, check out these blog posts: